
Blog
Data quality with Great Expectations

 3 minute read
03.05.2023
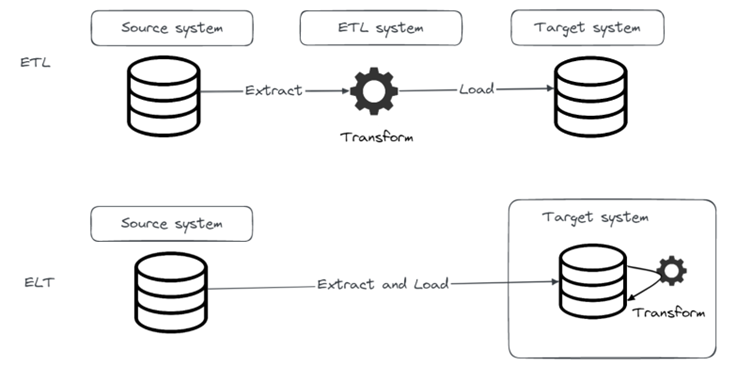
So far in this blog series, we demonstrated an open-source stack of tools that can be used for implementing ELT jobs. As data practitioners, we should always have data quality in mind and make sure that data quality is taken care of in every project or pipeline we do. In this last part of the series we’ll demonstrate a very popular Python library for data quality, Great Expectations.
Great Expectations is an open-source Python library that helps data scientists and engineers validate, profile, monitor and document data to improve data quality and communication between teams. It provides a set of tools for defining and managing expectations about your data, which can help you catch errors and identify issues early in your pipeline. In this post, we’ll explore some of the key features of Great Expectations and show how it can be used in practice.
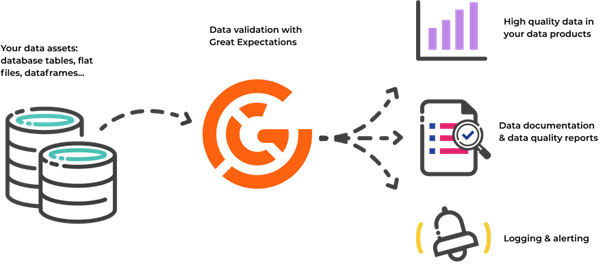
Figure 1. Great Expectations
Introduction to Great Expectations
Every team that works with data, sooner or later stumbles upon bad quality data. For real-life projects it would be more accurate to say that teams face bad quality data almost every day. So, for data teams it is crucial to focus on data quality for two reasons, inner peace and happy stakeholders.
By incorporating Great Expectations in data pipelines, we can detect data quality issues before stakeholders and act on it immediately.
But first, let’s start by explaining how we can start with Great Expectations.
Since Great Expectations is a Python library it can easily be installed on-prem or integrated in various cloud environments. Not long ago, a fully managed SaaS solution was Beta released.
In our examples we will use Great Expectations installed on-prem simply by running.
python -m pip install great_expectations
Installation will install a cli we can use. So, to check if the installation was successful we can run the following command to get the great_expectations version.

Next step is to initialize a great_expectations project by running the init command.
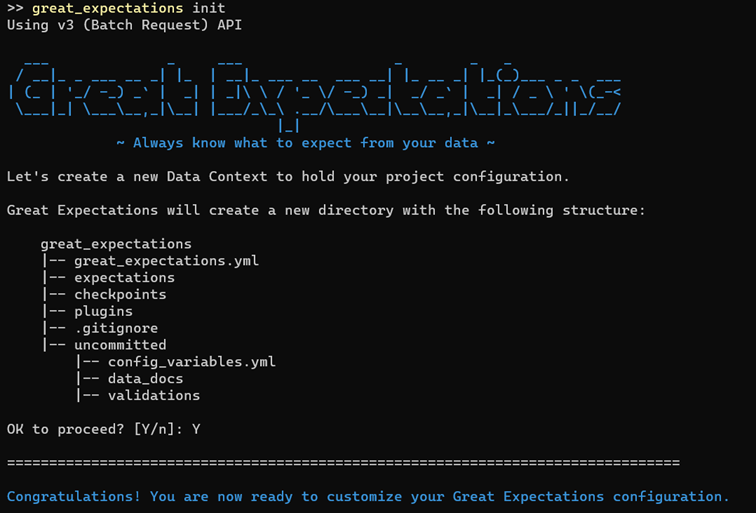
As we can see, init command prepared a great_expectations directory structure with some basic files. The most important files and folders we’ll work with in the blog are:
great_expectations.yml
-Used to define data sources, integrations and configure more Great Expectations features
expectations
-Directory in which expectation suites will be defined
-This will contain actual tests that will be run on our data
checkpoints
-Data is validated through checkpoints, and they are defined in the checkpoints folder
-Through a checkpoint our data will be validated, validation results will be saved and data docs will be created
The usual process of working with Great Expectations would consist of those three steps, connecting to data sources, defining expectations and finally creating and running checkpoints to validate data and generate results.
Data sources
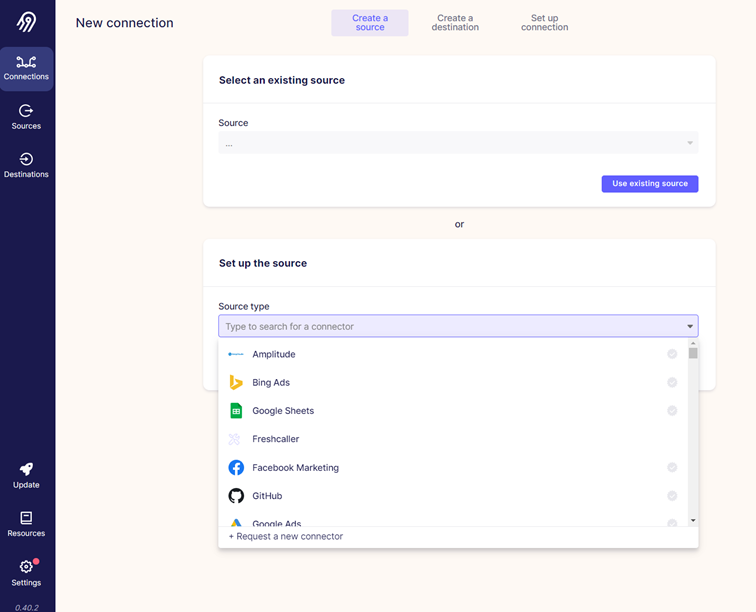
The first step when working with data quality is to get the data. Great Expectations supports a wide variety of sources it can connect to, ranging from filesystems, S3, cloud data stores, relational databases to any other database you can connect to with SQLAlchemy. To connect to our database with Great Expectations, we can again utilize CLI datasource new command to help us with that. In our example we will connect to Postgres database.
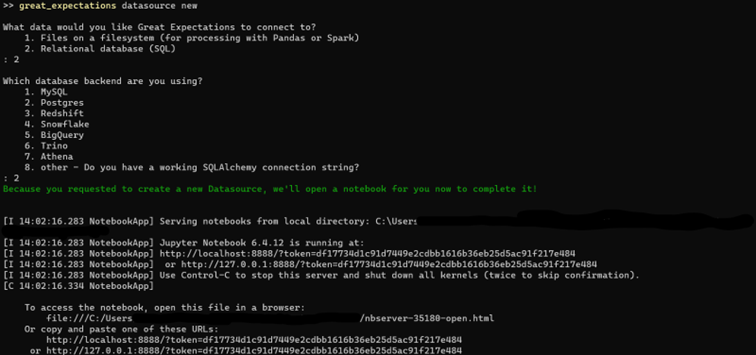
Through CLI prompts we specified we want to connect to Postgres database. After that Great Expectations prepared a Jupyter Notebook that has a template ready to help us finish setting up a connection to database. After we type in the necessary information in Jupyter Notebook paragraphs and run them, Notebook will test connection and write all connection details into great_expectations.yml file. Using CLI and Jupyter Notebooks is not mandatory, but it helps, especially if you’re just starting with Great Expectations. Instead of using CLI and Jupyter Notebooks, you can write all necessary configuration directly into great_expectations.yml file, expectations and checkpoints folder.
If you haven’t already, we encourage you to try Great Expectations yourself, and use Jupyter Notebooks. But in the remainder of this blog post, we won’t be using it, instead we will write directly into configuration files and explain all important bits of it.
Let’s look at how we can define a data source in great_expectations.yml file.
# Datasources tell Great Expectations where your data lives and how to get it.
# You can use the CLI command `great_expectations datasource new` to help you
# add a new datasource. Read more at https://docs.greatexpectations.io/docs/guides/connecting_to_your_data/connect_to_data_overview
datasources:
  streaming_pipeline_uc_postgres:
    class_name: Datasource
    module_name: great_expectations.datasource
    execution_engine:
      class_name: SqlAlchemyExecutionEngine
      module_name: great_expectations.execution_engine
      credentials: ${streaming_pipeline_uc_db_yaml_creds}
    data_connectors:
      default_runtime_data_connector_name:
        module_name: great_expectations.datasource.data_connector
        batch_identifiers:
          - default_identifier_name
        class_name: RuntimeDataConnector
      default_inferred_data_connector_name:
        include_schema_name: true
        module_name: great_expectations.datasource.data_connector
        class_name: InferredAssetSqlDataConnector
Data sources in great_expectations.yml file are defined under datasources. First item in datasources, in our example streaming_pipeline_uc_postgres is the name of the data source, under which we define specific configurations for that data source. Most of the configuration is related to a data source type. We will focus on execution_engine part of the configuration, and since this is a introduction to Great Expectations we won’t go into details about other configurations.
execution_engine:
     class_name: SqlAlchemyExecutionEngine
     module_name: great_expectations.execution_engine
     credentials: ${streaming_pipeline_uc_db_yaml_creds}
Under execution_engine, the first two parameters: class_name and module_name are used to describe what type of engine is used to connect to our data source. Since we are connecting to a relational database, SQLAlchemy will be used. Last, but not least important parameter is credentials, which specifies credentials used to connect to data source. What you must have noticed is that value for the credentials parameter is probably not what you expected, hostname, username, password, etc. That’s because all that information is stored in file config_variables.yml under uncommited folder. Another important thing to note is that there is a default .gitignore rule in great_expectations folder that ignores uncommited folder. That way we make sure that no secrets are pushed to git.
Here is the config_variables.yml file used in our example.
streaming_pipeline_uc_db_yaml_creds:
  drivername: postgresql
  host: <HOSTNAME>
  port: 5432
  username: streaming_pipeline
  password: <PASSWORD>
  database: streaming_pipeline_uc
In the root item we specify the name of the data source, which is used as a reference in the credentials parameter we used in great_expectations.yml file.
After that we specify host, port, username, password and database we are connecting to. Along with a driver name that is used when forming a SQLAlchemy connection string.
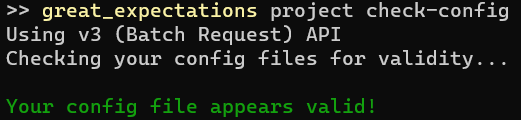
Now that credentials for data source are saved to config file, we can test connection to data store using CLI command project check-config. This command will not only test connection to data sources, but also check correctness of configuration files using in a project.
If we specified wrong password, we’ll get the following error.

Great! We have a working connection to our data source. We demonstrated how the connection details were specified in great_expectations.yml, we could specify as much connections to data sources as we want in the configuration file, but for this blog post we will use only one Postgres data source.
Expectations
Now that we have a connection to data source, we can move on and start creating expectations.
Expectations are assertions about your data, expressed in the form of simple, human-readable Python methods. For example, in order to assert that you want the column “symbol” to not contain null values, you would use the following method
expect_column_values_to_not_be_null(

column=”symbol”

)
There are a lot of expectations ready to use in Great Expectations and we can browse through them here https://greatexpectations.io/expectations/
Since expectations are simply Python methods, if an expectation we need is not available, we can create whatever expectation we would like, add it to our project and contribute to open-source Great Expectations project.
In our example, for which we will define expectations, we will use a simple dataset, actually just one table “trade” that contains trades of crypto coins. Here are a couple of rows from that table.
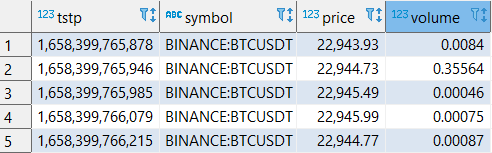
It contains only 4 rows:
tstp
Timestamp at which a trade was made
symbol
Symbol of a pair traded on a market
price
Price at which a trade was made
volume
Volume of coins involved in a trade
Expectations can be defined on a table level, or on a column level. In our example we will demonstrate both. So here is what we want to assert on our “trade” table and the respective expectations we will use:
Table level
Table row count greater than 0 – expect_table_row_count_to_be_between
Column level
Symbol column values to not be null – expect_column_values_to_not_ne_null
Volume column values to be larger than 0 – expect_column_values_to_be_between
Expectation suite
Expectations are grouped in suites. So, the expectations we will define will actually be written in a single json file that represents a expectation suite.
We could use CLI command suite new that will generate Jupyter Notebooks and help us in defining expectations in a suite. But we will again skip that and write expectations directly in a file.
This is how a expectations suite template would look like:
{
  "data_asset_type": null,
  "expectation_suite_name": "streaming_pipeline_uc_suite",
  "expectations": [...],
  "ge_cloud_id": null,
  "meta": {
    "great_expectations_version": "0.16.6"
  }
}
There are two important items in a suite json file:
-expectation_suite_name
-Uniquely identifies the suite name
-expectations
-Array of expectations defined in a suite
Great! Let’s add first expectation to expectations array:
{
  "expectation_type": "expect_table_row_count_to_be_between",
  "kwargs": {
    "min_value": 1
  },
  "meta": {
    "notes": {
      "format": "markdown",
      "content": "`Trade` table must not be empty"
    }
  }
}
Each expectation will contain three items:
expectation_type
-Assertion that will be run on our data
kwargs
-Expectations are Python methods and depending on the type of assertion they accept some parameters
-Each parameter and it’s value is defined in kwargs (some parameters can be optional)
meta
-Place where we can provide extra information, or metadata, about the assertion
-For example, this is where we write notes that will be visible in the documentation
We can go ahead and add as much expectations we want to our suite. Here is how our full expectation suite looks like for the expectations we defined above:
{
  "data_asset_type": null,
  "expectation_suite_name": "streaming_pipeline_uc_suite",
  "expectations": [
    {
      "expectation_type": "expect_table_row_count_to_be_between",
      "kwargs": {
        "min_value": 1
      },
      "meta": {
        "notes": {
          "format": "markdown",
          "content": "*Trade* table must **not be empty**"
        }
      }
    },
    {
      "expectation_type": "expect_column_values_to_not_be_null",
      "kwargs": {
        "column": "symbol",
        "mostly": 1
      },
      "meta": {
        "notes": {
          "format": "markdown",
          "content": "Crypto coin symbol must **not be null**"
        }
      }
    },
    {
      "expectation_type": "expect_column_values_to_be_between",
      "kwargs": {
        "column": "volume",
        "min_value": 0,
        "strict_min": true
      },
      "meta": {
        "notes": {
          "content": "Crypto trade volume must be larger than 0",
          "format": "markdown"
        }
      }
    }
  ],
  "ge_cloud_id": null,
  "meta": {
    "great_expectations_version": "0.16.6"
  }
}
Checkpoints
So far, we defined what expectations are in Great Expectations, connected to our Postgres database and defined a set of expectations in our expectation suite.
One thing that you probably noticed is that while specifying expectations suite, we didn’t specify any reference to the actual data source on which that suite will be run. That, and much more is defined in a checkpoint. This separation of expectations and data sources enables us to specify expectation suite once and then run it on multiple data sources.
Checkpoints are defined in a checkpoints folder in form of yaml files. Let’s take a look at our streaming_pipeline_uc_checkpoint.yml checkpoint file:
name: streaming_pipeline_uc_checkpoint
config_version: 1.0
class_name: Checkpoint
run_name_template: '%Y%m%d-%H%M%S-my-run-name-template'
validations:
  - batch_request:
      datasource_name: streaming_pipeline_uc_postgres
      data_connector_name: default_inferred_data_connector_name
      data_asset_name: public.trade
      data_connector_query:
        index: -1
    expectation_suite_name: streaming_pipeline_uc_suite
action_list:
  - name: store_validation_result
    action:
      class_name: StoreValidationResultAction
  - name: update_data_docs
    action:
      class_name: UpdateDataDocsAction
First few items in a file define some basic or mandatory information, like checkpoint name or run_name_template. The two items we will be focusing on are validations and action_list. But before diving into them, let’s take a look at what actually checkpoint does for us and how the whole process looks like.
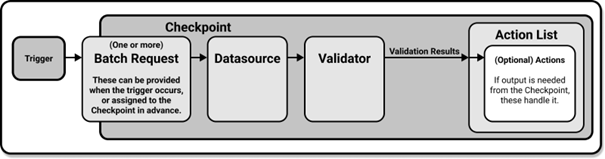
Figure 2. Data validation using Checkpoints
Checkpoints provide a abstraction for bundling the Validation of a Batch of data against an Expectation Suite, as well as the Actions that should be taken after the validation. It will validate data, save validation results, run any Actions you specified, and finally create Data Docs with their results.
Batch Request contains all the necessary details to query the appropriate underlying data. In our example we want to run only one expectation_suite on one table, so in the checkpoint we specified only one batch request under validations. If we wanted to run multiple batch requests we would simply define them under validations.
So what does the batch request contains, a specification on what data will form a batch. In our case we specified a postgres data source name and data asset name (table) on which we want to run expectation suite. Since we want to run expectations on all data in trade table, we didn’t specify any query. But if we wanted to run expectation only on a certain subset of data, we could’ve specified it under the data_connector_query parameter.
Great! In our validation we have a batch request specified, we just need to specify a expectation suite that we want to assert on that data. We do that by specifiying suite name under expectations_suite_name parameter.
Last part of checkpoint that we will go through is action list. There is a set of actions that can be run after validation is finished. That includes storing validation results, updating documentation, sending email, Slack or Teams notification. Important thing to note is that action list can’t be empty.
In our example we used two actions:
Store validation results
This action will store validation results in a store specified in great_expectations.yml configuration
Update data docs
Notifies builders of the data docs that a validation result should be added to the data docs
So, after we run the checkpoint our data, assertions specified in expectations suite will be run on data, validation results will be stored and documentation will be updated.
Only thing left for us to do in this chapter is to run the checkpoint. There are again multiple ways we could do that. Here is how we can do it with CLI command checkpoint run

From the command output we can see that 2 out of 3 expectations are met. Which expectation wasn’t met, we’ll se through data docs.
Data docs
Expectations, validation_results and additional metadata we specify can be documented in Great Expectations data docs. Since we defined UpdateDataDocsAction in our checkpoint, our documentation will be ready for us after checkpoint is run. By default, index page will be stored in uncommitted/data_docs/local_site/index.html. There are ways to permanently serve documentation on web server on-prem or in cloud, but we won’t go into that here. We’ll serve the file locally just to demonstrate what the generated documentation offers us.
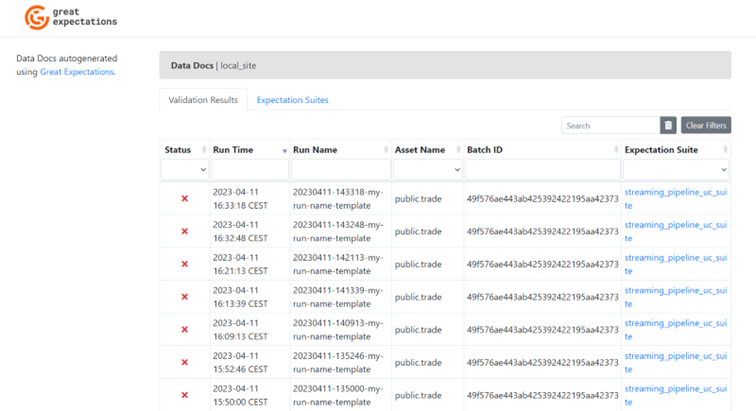
Figure 3. Data Docs UI
On the Data Docs home page we see two tabs: Validation Results and Expectation Suites. In the validation results, all checkpoint runs will be specified along with the status of run, at what time it was run, what asset and what expectation suite was run.
If we click on it, we can get more information on the run. So let’s look at our last run, and figure out why it failed.
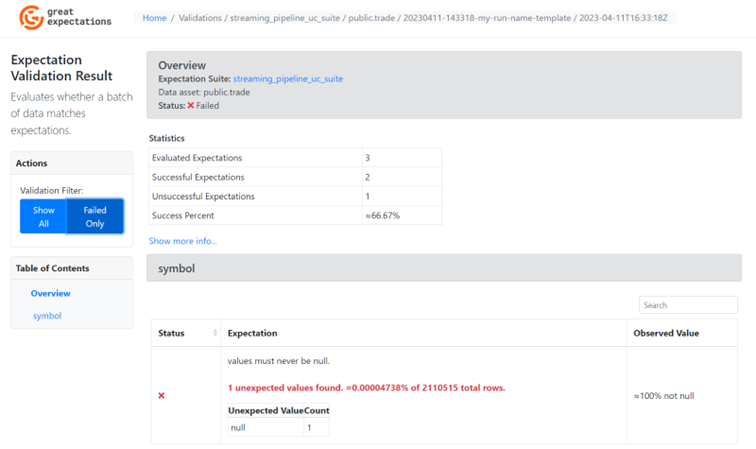
Figure 4. Validation result
On the left hand side we can choose to show only expectations that aren’t met, so we’ll do that for the sake of readability. What we can see on the screenshot above is the general information and statistics about the validation run. And at the bottom of the page we can see the column name (symbol) and which expectation was not met on that column.
From the expectation we can see that value must never be null, but our table had 1 unexpected value, which was null.
Going back to home page, Expectation Suites tab and then choosing streaming_pipeline_uc_suite, we can get more information about our expectation suite. One thing to note is that all notes we specified in the expectation suite yaml file are visible in the documentation.
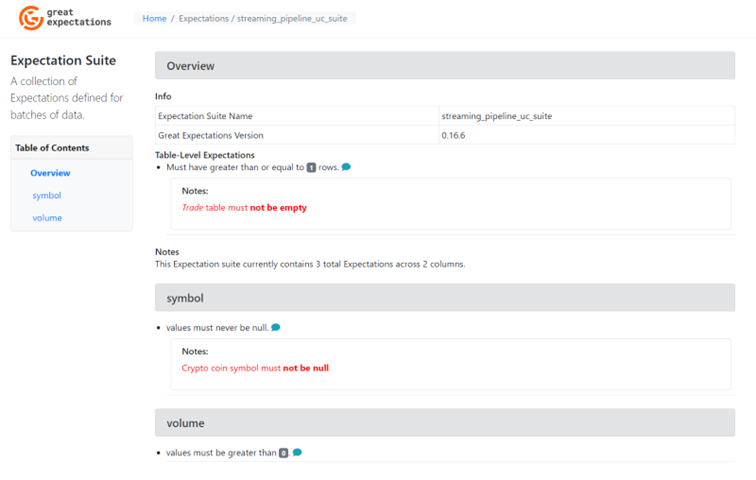
Figure 4. Validation result
And there you have it! A fully functioning Great Expectations project that will validate your data, store results and serve data documentation.
What’s next?
With this blog we wrap up the “Modern ETL” blog series. Throught the series we wanted to give an overview of some of the most popular modern open-source tools that can be used for ETL/ELT.
This was just the first series of blogs we will release this year with data related topics. Moving data and transforming it is definitely one of the main reasons why every data system exist. But to do it in a way that is efficient and produces high quality results we must not ignore data governance and data quality. Which is exactly what our next blog series will focus on.
So, stay tuned for the data governance series! And may your data always be of good quality 🙂