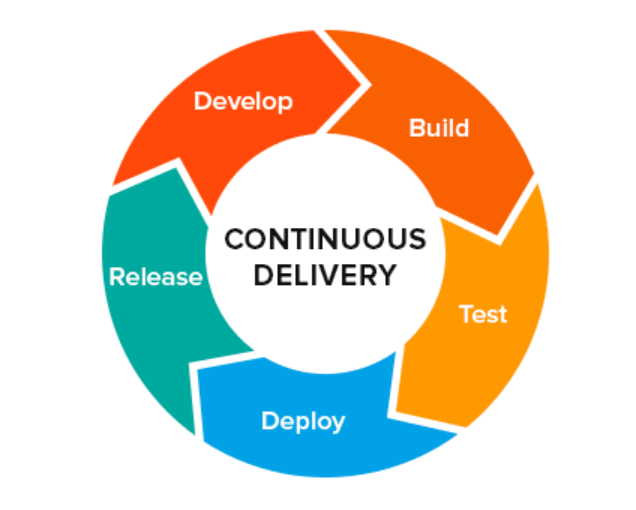
With the current business (and development!) culture of rapid iterations, complex organizations, varied system infrastructure and a need to respond fast to changes, DevOps tenets of release automation are among the core practices used in modern software development. By reducing the amount of human steps, releases can occur faster and with less errors.
The project we are examining is based on IBM App Connect Enterprise (ACE). It is an integration platform, used as a service bus that routes, transforms and enriches messages as they pass thru it.
We have implemented multiple integration projects, with multiple services, each in turn designed per the needs of their client systems. Each service acts as a proxy – it handles the information where the data is sourced from, and how to transform or enrich it, as well as some business logic specific to the datasources. These solutions are developed, versioned, build and deployed independently one from another.
The target runtime is a containerized one, hosted within a RedHat OpenShift Container Platform (OCP), hosting a CloudPak for Integration (CP4I) offering.
Motivation
As the solutions are distinct, each with its own business owners, requirements, release plans and schedules, there is a risk of creating complex deployment plans and procedures.
Leveraging DevOps, our aim is to have a singular and scripted process that takes the simplest of inputs. It is to be agnostic which service is being deployed and where is it being deployed to. The goal is to have build and deploy procedures that are maximally templated and automated – no matter which service is being deployed on any environment, the procedure, tools and scripts are to be the same. With it the chances of human error are minimized, operations are target-agnostic and everything is done automagically.
The release procedure is thus reduced to these actions:
version tagging the release candidate
building the packages
deploying it to the target environment
After quality verification and business confirmation, promotion to higher environments comes down to simply repeating the last step with a different target.
Approach
As we are targeting an OCP environment, we will be leveraging the power of the ACE Operator to handle the creation of a integration server that will be running our solution. All information to do so, is described in a single* IntegrationServer Custom Resource (CR).
*While the final server is described with a single CR, supplementary configuration is described in separate resources. Those are either generated and linked at the time of deployment [policies: backend endpoints, API keys, MQ details] or are pre-created and made available [server configs: SSL info, authentication details].
Below is a simple example of a such CR [also is used as a template in a later section of this document]:
apiVersion: appconnect.ibm.com/v1beta1
kind: IntegrationServer
metadata:
  name: petstoreIS
  namespace: petstoreNS
spec:
  enableMetrics: true
  disableRoutes: true
  license:
    accept: true
    license: XXXXXXX
    use: CloudPakForIntegrationNonProduction
  pod:
    containers:
      runtime:
        volumeMounts:
          - mountPath: /home/aceuser/truststores/ace-truststore.jks
            name: truststore
            subPath: ace-truststore.jks
          - mountPath: /home/aceuser/truststores/ace-keystore.jks
            name: keystore
            subPath: ace-keystore.jks
        resources:
          limits:
            cpu: 500m
            memory: 2Gi
          requests:
            cpu: 10m
            memory: 500Mi
    volumes:
      - name: truststore
        secret:
          items:
            - key: truststore.jks
              path: ace-truststore.jks
          secretName: petstore-truststore
      - name: keystore
        secret:
          items:
            - key: keystore.jks
              path: ace-keystore.jks
          secretName: petstore-ssl
  adminServerSecure: true
  router:
    timeout: 120s
  designerFlowsOperationMode: disabled
  createDashboardUsers: true
  service:
    endpointType: http
  version: 12.0.12-r2
  logFormat: basic
  replicas: 1
  barURL: <BAR_URL>
  configurations:
    - petstore-policy
    - generic-barauth
    - generic-setdbparams
    - generic-server-config
The main entries:
- name – the integration server that is being deployed
- barURL – the deployment artifact of the developed service that is to be run
- configurations – supplementary resources used by the IS during startup for its setup
- policy – project configuration, contains environment specific values
- barauth – authentication information used during the fetch of the BAR file from the remote repository
- setdbparams – authentication information used by the server during its runtime (e.g. MQ identity, kafka account, truststore passkey)
- server-config – server configuration (e.g. remote QM info, logging details, SSL config)
Some technical points of interest:
- version – possible values depend on the ACE operator version running on the cluster
- license information – these differ depending on the target env. [prod vs nonprod] and server version
- volumes – pre-created secret containing SSL certificates
- disableRoutes – the ACE operator creates a route in a specific format [due to the fact that we want to control the format, automatic route creation is disabled and a custom one is to be created during deployment, more on it later]
If our goal is to automate deployments, our goal in essence is to automate the creation of such a CR and any configurations that are deployment specific. The operator in turn will handle the heavy-lifting of spinning up a new container, pre-configuring the server, pulling the BAR file, and routing the network to the new instance while shutting down the old one.
Solution
To create and run our pipeline, we are going to leverage OpenShift Pipelines and Tekton. This will make it easier to create modular pipeline steps that can be reused within different pipelines and multiple clusters.
Looking at the release procedure that we outlined above, out of the three actions, two are presented as obvious candidates for automation, with special considerations for both:
- build procedure – needs to be run only once, needs to create a release package [BAR files] and upload it to a repository, both for safekeeping and as a datasource for the release pipeline
- deploy procedure – is to be run per deployment, needs to create both the IntegrationServer CR and the policy CR, also needs to create a custom OCP route
Both are to be used for different ACE services, i.e. which service is being built/deployed is simply passed as a parameter. As there is no need to force a new build on each deployment or vice versa, these will be implemented as two pipelines; they will be run separately as the need arises.
Note on common items
As we aim to create an automated and templated solution, we will need to identify (or in same cases force) common formats, structures and standards within the various projects that will be covered by these pipelines.
Examples that are common:
- while all projects are in different git repositories, their naming conventions are standardized – the project names, directory structures
- all projects contain the same supplementary files that are used by the pipelines [e.g. the IS CR template, services list file, bar override file, environment override file], each with project specific values
These files, while not needed for running the integration solution, are necessary for the pipelines and as such they are kept together with the code in the same repository.
Build Pipeline
The build procedure is a simple, three step pipeline:
- fetch
- build
- upload
that share a single Tekton workspace [i.e. the filesystem where the results of each step are maintained between the steps], and using only two inputs:
- service name
- version

Using the name and version, it will perform a git clone of the project. For this there already exists a pre-defined tekton task, so we will skip further explanation and go straight to the next step.
The build step uses an `aceminimal` container image, that contains an ACE instalation able to build a BAR package using the same tools a developer uses on his local machine. For this case we use a pair of commands:
- `ibmint package` – to generate a BAR file from the project
- `ibmint apply overrides` – to override some project values to target running on a non-developer environment. This overrides are environment agnostic, and are done only once – e.g. amending the endpoint the ACE server will expose* and indicating the multiple listening threads are to be used
For this, we use a `services.txt` file that contains a comma-separated list of services that are build and deployed together. We then use a `<serviceName>-overrides.txt` that contains the service specific components that are to be overridden, e.g:
gen.PetstoreService#SOAP Input.urlSelector = /petStoreService/VERSION
gen.PetstoreService#additionalInstances = 5
gen.PetstoreService#startInstancesWhenFlowStarts = False
We use semantic versioning for our services, in the vX.Y.Z format. The major, X value, is then also used as the URI the integration service exposes [e.g. /petStoreService/vX]. This allows us to have different major versions of the same service active at the same time, without URL conflicts
The script of the build task is thus:
export LICENSE=accept
source /opt/ibm/ace-12/server/bin/mqsiprofile
MAJOR=v$(echo $BUILD_VERSION | cut -d. -f1)
SERVICES=$(<./${APPLICATION_NAME^^}/services.txt)
for SERVICE in $(echo $SERVICES | tr ',' '\n')
do
   FILE_PATH="./release/${BUILD_VERSION}/${SERVICE}-${BUILD_VERSION}.bar"
   ibmint package --input-path ./${APPLICATION_NAME^^} --output-bar-file ${FILE_PATH} --project  ${SERVICE} --project ${SERVICE}Java
   sed -i "s/VERSION/${MAJOR}/g" /${APPLICATION_NAME^^}/${SERVICE}-overrides.txt
   ibmint apply overrides ./${APPLICATION_NAME^^}/${SERVICE}-overrides.txt --bar-file ${FILE_PATH}

done
The final step then takes the created BAR files and uploads them to our artifact repository
SERVICES=$(<./${APPLICATION_NAME^^}/services.txt)
for SERVICE in $(echo $SERVICES | tr ',' '\n')
do
   curl -k -v -u ${UPLOAD_USER_NAME}:${UPLOAD_USER_PASSWORD} --upload-file release/${BUILD_VERSION}/${SERVICE}-${BUILD_VERSION}.bar ${REPO_SERVER_BASE_URL}/${REPOSITORY_NAME}/${REPO_PATH}/${APPLICATION_NAME}/${SERVICE}/${BUILD_VERSION}/${APPLICATION_NAME}-${SERVICE}-${BUILD_VERSION}.bar
done
The result of this pipeline is the BAR files are uploaded on the target repository, on a well defined path. Re-running the build procedure using the **same** input values will rebuild the solution and overwrite the stored artifact.
Deployment pipeline
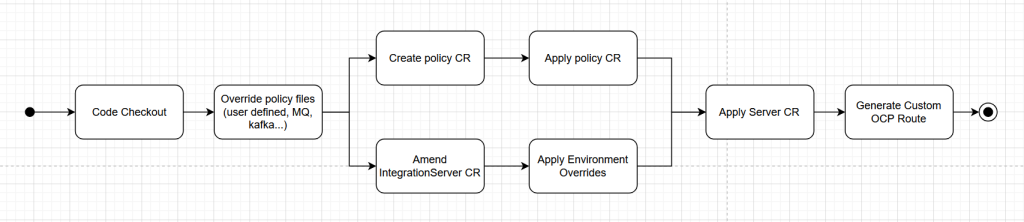
The deployment procedure is a bit more complex, but reuses many of its steps:
- fetch
- create policy configuration
- override policy file with env. overrides
- create policy CR
- apply resource to cluster
- generate IntegrationServer CR
- prepare project specific CR
- override with env. specific values
- apply resource to cluster
- generate custom route
These also share a single Tekton workspace. The input of this pipeline is just slightly extended:
- service name
- version
- target environment
*Even though our procedures support using the same deployment pipeline for any target environment, some customers tend to have separate OCP clusters: splitting production [and prod-like] env from others [dev, test, staging, performance]. In such cases, the only difference is having the **same** deployment pipeline defined in both clusters and triggering the appropriate one on release.
The first step is a reuse of the same step in the build pipeline, as we are fetching the same project from the same repo.
The next segment is concerned with the creation of the policy configuration. There can be multiple policies [one per service] and of different types [e.g. user defined, MQ, kafka]. These policies contain environment specific configuration – Kafka URLs, QM channels, API keys… They are XML based and look like this:
User defined:
    <BACKEND_ENDPOINT>localhost</BACKEND_ENDPOINT>
    <BACKEND_API_KEY>API_KEY</BACKEND_API_KEY>

MQ:
    <queueManagerHostname>myMqServer.intranet.example.com</queueManagerHostname>
    <listenerPortNumber>MQ_PORT</listenerPortNumber>

Kafka:
    <bootstrapServers>KAFKA_SERVER</bootstrapServers>
    <securityProtocol>SASL_SSL</securityProtocol>
    <saslMechanism>SCRAM-SHA-512</saslMechanism>
These files [name.policyxml] either have placeholders or values specific for the dev environment. Real values are stored in a `configurableservice.yaml`
TEST:
  environment: test
  server: api.gw.test.example.com
  apikey: 607eb6ff9009410ca9d5ee28c1912a15
  qmgrport: 1415

STAGING:
  environment: eprod
  server: api.gw.eprod.example.com
  apikey: e520bf7f21a34092bf135a8cb18f0e0c
  qmgrport: 1414

PROD:
  environment: prod
  server: api.gw.prod.example.com
  apikey: 20d6e9f653b4481a84e46f44bcdde6c2
  qmgrport: 1414
The override step has access to both and its job is to amend the policy file(s) with the values for the target env. Its script step is:
server=$(yq -r .$TARGET_ENV.server configurableservice.yaml)
newKey=$(yq -r .$TARGET_ENV.apikey configurableservice.yaml)
policyFiles=$(ls *policyxml)
for file in $policyFiles; do
   sed -i "s/localhost/${server}/g" $file
   sed -i "s/API_KEY/${newKey}/g" $file
done
###
# the following is a separate Tekton task, but for brevity it is added here
###
#check if this step is needed - does a 'mq_policy.policyxml' file exists?
mqPolicyFile="mq_policy.policyxml"
if [[ ! -f ${mqPolicyFile} ]]; then
   echo "MQ Policy file does NOT exist! Skipping step..."
   exit 0
fi
qmgr_port=$(yq -r .$TARGET_ENV.qmgrport configurableservice.yaml)
sed -i "s/MQ_PORT/${qmgr_port}/g" $mqPolicyFile
Now, our workspace [within the context of the pipeline] contains the amended policy files. These files need to be prepared to be forwarded to the ACE operator. For that, they need to be packaged in an archive, base64 encoded and wrapped in an OCP configuration resource.
# zip and encode
zip -r policy_$APPLICATION_NAME.zip policy_APPLICATION_NAME
encoded=$(base64 -w 0 policy_$APPLICATION_NAME.zip)
# generate Configuration resource
printf "apiVersion: appconnect.ibm.com/v1beta1\n" >> ${PROJECT_NAME}_policy.yaml
printf "kind: Configuration\n" >> ${PROJECT_NAME}_policy.yaml
printf "metadata:\n" >> ${PROJECT_NAME}_policy.yaml
printf "  namespace: $OCP_NAMESPACE\n" >> ${PROJECT_NAME}_policy.yaml
printf "  name: $PROJECT_NAME-policy\n" >> ${PROJECT_NAME}_policy.yaml
printf "spec:\n" >> ${PROJECT_NAME}_policy.yaml
printf "  data: $encoded\n" >> ${PROJECT_NAME}_policy.yaml
printf "  description: ${PROJECT_NAME}_policy_encoded\n" >> ${PROJECT_NAME}_policy.yaml
printf "  type: policyproject\n" >> ${PROJECT_NAME}_policy.yaml
After which the file is applied to the cluster, which is a simple step
oc apply -f ${PROJECT_NAME}_policy.yaml
With the policy files set, we are ready to create the main IntegrationServer CR. A template for this CR, such as the one given at the start of this document, already exists in the repo, with all the default values already set, so no need to manually create it as we did the policy file. We just need to set some project specific values. We use yq for easy yaml modification [Due to its fickleness, we make amends in a temp file, that we switch with the main file in the end]
# each service has its own BAR file, we need to pass a comma-seperated list into the final CR
totalBarUrl=""
SERVICES=$(<./${APPLICATION_NAME^^}/services.txt)
for SERVICE in $(echo $SERVICES | tr ',' '\n')
     barUrl=${REPO_SERVER_BASE_URL}/${REPOSITORY_NAME}/${REPO_PATH}/${APPLICATION_NAME}/${SERVICE}/$BUILD_VERSION/${APPLICATION_NAME}-${SERVICE}-${BUILD_VERSION}.bar
     totalBarUrl=$barUrl,$totalBarUrl
done
#remove last ','
totalBarUrl=`echo $totalBarUrl | sed 's/.$//'`
yq --yaml-output ".metadata.name=\"$PROJECT_NAME\"" $BASE_YAML  >  temp.yaml
cat temp.yaml > $BASE_YAML
yq --yaml-output ".metadata.namespace=\"$OCP_NAMESPACE\"" $BASE_YAML > temp.yaml
cat temp.yaml > $BASE_YAML
yq --yaml-output ".spec.barURL=\"$totalBarUrl\"" $BASE_YAML > temp.yaml
cat temp.yaml > $BASE_YAML
yq --yaml-output ".spec.configurations[0]=\"${PROJECT_NAME}-policy\""  $BASE_YAML > temp.yaml
cat temp.yaml > ${PROJECT_NAME}_server.yaml
In the case where some integration server configuration differs per environment, e.g. having different CPU limits on TEST, or special license for PROD, we have an extra step. Here we use a `integrationServerConfigOverrides.yaml`, which is a simple map of values that differ per environment.
# Configuration for OCP integration server
DEV: <empty>
TEST:
    spec.pod.containers.runtime.resources.limits.cpu: 1500m
STAGING: <empty>
PROD:
    spec.license.license: AAAAAA
    spec.license.use: CloudPakForIntegrationProduction
Which we use in the override step
config=$(yq -r .$TARGET_ENV ${OVERRIDE_FILE} | grep -o ":" | wc -l)
if [[ $config -eq 0 ]]; then
    echo "No config for $TARGET_ENV! Skipping step..."
    exit 0
fi
keys=$(yq --yaml-output .$TARGET_ENV ${OVERRIDE_FILE} | cut -d ":" -f 1)
values=$(yq --yaml-output .$TARGET_ENV ../${OVERRIDE_FILE} | cut -d ":" -f 2- | tr -d '\n' | xargs)
valueArray=($values)
i=0
for key in $keys; do
    if [[ $key == "{" ]]; then
        i=$(( i + 1 ))
        continue
    fi
    echo "KEY: $key"
    original=`yq -r ".${key}" ${PROJECT_NAME}_server.yaml`
    echo "  Original value: $original"
    value="${valueArray[$i]}"
    echo "  Updated value: $value"
    yq --yaml-output ".$key=\"$value\"" ${PROJECT_NAME}_server.yaml > temp.yaml
    cat temp.yaml > ${PROJECT_NAME}_server.yaml
    i=$(( i + 1 ))
done;
With this, our CR is completed and can be sent to the cluster, reusing the same task for applying the resource
oc apply -f ${PROJECT_NAME}_server.yaml
With this, the operator will start creating all the required cluster objects needed for a new container to be deployed. One final step we mentioned is the custom route creation. In it we create a route object, with the preferred URL structure. We also link it with the parent resource (IntegrationServer CR) so that in the case of deletion, the route is deleted as well, keeping things tidy.
oc project ${OCP_NAMESPACE}
oc create route passthrough ace-${SERVER_NAME}-https --port https --service ${SERVER_NAME}-is --hostname ${SERVER_NAME}-https.mycustomserver.${env}.openshift.local
oc label route ace-${SERVER_NAME}-https type=${env}-router
#fetch uuid for server CR
serverUid=`oc get IntegrationServer ${SERVER_NAME} -o jsonpath='{.metadata.uid}'`
#set routes to be managed by Integration server CR
patchValue="{\"metadata\": {\"ownerReferences\": [{\"apiVersion\":\"appconnect.ibm.com/v1beta1\",\"kind\":\"IntegrationServer\",\"name\":\"${SERVER_NAME}\", \"uid\":\"${serverUid}\",\"controller\":true,\"blockOwnerDeletion\":false}] }}"
oc patch route ace-${SERVER_NAME}-https -p "${patchValue}"
With it, a new IntegrationServer deployment is started and an instance is being instantiated. The operator tracks its startup and once it gets the proper green light, redirects service traffic to that pod and shuts down the previous version. A minor thing to note about this pipeline, is that in the case of a rerun [with the same input values], all the steps will be re-done, however the cluster kube controller will notice that already existing definitions [i.e. the CR contents are identical] are being applied and will skip those steps. You will get a “green” pipeline run, but no actual change will have been done.
Final thoughts
With our new DevOps process we have successfully automated our release operations. Promoting a release to a higher environment now consists of simply triggering a pipeline with parameters that answer: ‘which version of what goes where?’. As the same procedure is used on all environments, we have the confidence that it does what it needs to.
The various override options [service, project or environment specific] offer powerful options for easy configuration changes – easily switch a backend endpoint on the staging environment, or lower the resource requirements on test. With all the deployment configuration stored in the same repository as the service itself, changes are tracked and versioned.
Falls Sie Fragen haben, sind wir nur einen Klick entfernt.