
In this blog, we’ll cover MLOps by integrating MLflow into the Kubeflow service and show an example of training a Machine learning (ML) model. You can find an overview of MLflow here, and Kubeflow here.
Setup
For demonstration purposes, we’re going to use local Kubernetes with MicroK8 and using Juju as Charmed Operator Lifecycle Manager (OLM).
Charmed Kubeflow is a collection of charms, software components that contain information necessary for deploying an application.
We recommend using the Ubuntu system because everything works out of the box with it. On WSL, you might find problems regarding using snap for installation, but if you’re insistent, this guide might be of help to you.
Steps for setting up Kubeflow
You can find more detailed tutorial here.
- Install and configure MicroK8
# install microk8s from snap sudo snap install microk8s --classic --channel=1.22/stable # add user to microk8s group to use without sudo sudo usermod -a -G microk8s $USER newgrp microk8s # give user ownership of kubectl config files sudo chown -f -R $USER ~/.kube # install extra features microk8s enable dns storage ingress metallb:10.64.140.43-10.64.140.49 - Install and configure Juju
# install juju from snap sudo snap install juju --classic # deploy juju controller to our microk8s juju bootstrap microk8s # set up model (namespace) in juju controller juju add-model kubeflow # must be "kubeflow" - Install and configure Kubeflow
# deploy kubeflow
juju deploy kubeflow-lite --trust
# this will take a few minutes
# ...
# setup dashboard service URL
juju config dex-auth public-url=http://10.64.140.43.nip.io
juju config oidc-gatekeeper public-url=http://10.64.140.43.nip.io
# enable simple authentication
juju config dex-auth static-username=admin
juju config dex-auth static-password=admin
Steps for integrating MLflow
You can find more detailed tutorial here.
- Deploy MLflow server and database
juju deploy mlflow-server juju deploy charmed-osm-mariadb-k8s mlflow-db - Integrate applications with MLflow server
juju relate minio mlflow-server
juju relate istio-pilot mlflow-server
juju relate mlflow-db mlflow-server
juju relate mlflow-server admission-webhook
Juju relations tell applications how to interact with one another if they have dependencies on each other, and what service each of the applications provides. E.g., The
mongodbcharm provides a relation nameddatabasewith themongodbinterface, and themy-node-appcharm requires a relation nameddatabasewith themongodbinterface. More information about them can be found here.
Wait until mlflow-server is active by monitoring juju status, and then you can access the MLflow dashboard by going to http://10.64.140.43.nip.io/mlflow/#/.
Scope
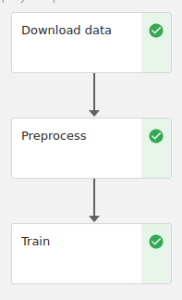
After setting up the Kubeflow we can start on our pipeline. For this tutorial, we’ll be using the Census Income dataset. It’s a tabular dataset that predicts whether U.S. citizens’ income exceeds $50K/yr based on census data from the year 1994. We’ll write a pipeline that will have three tasks: downloading data, preprocessing it, and training and saving the model in MLflow. This is what our pipeline will look like:
Components
We’ll start with download component because it’s the first and it already exists in the Kubeflow Pipeline components registry, all we have to do is use kfp.component.load_component_from_url and copy the URL of the raw file into our code.
web_downloader_op = load_component_from_url(
    "https://raw.githubusercontent.com/kubeflow/pipelines/master/components/contrib/web/Download/component.yaml"
)
Defining custom components and tasks in Kubeflow requires more work, but it isn’t complicated. Let’s walk through the preprocess component:
def preprocess(file_path: InputPath("CSV"), output_file: OutputPath("CSV")):
    import pandas as pd

    header = [
        "age",
        "workclass",
        "fnlwgt",
        "education",
        "education_num",
        "marital_status",
        "occupation",
        "relationship",
        "race",
        "sex",
        "capital_gain",
        "capital_loss",
        "hours_per_week",
        "native_country",
        "income",
    ]
    df = pd.read_csv(file_path, header=None, names=header)
    # encode categorical data as integers
    categorical_columns = [
        "age",
        "workclass",
        "education",
        "marital_status",
        "occupation",
        "relationship",
        "race",
        "sex",
        "native_country",
        "income",
    ]
    df[categorical_columns] = df[categorical_columns].apply(
        lambda x: x.astype("category").cat.codes, axis=0
    )
    df.to_csv(output_file.path, index=False)

preprocess_op = create_component_from_func(
    func=preprocess, base_image="python:3.9", packages_to_install=["pandas"]
)
There are two steps to making components from functions:
- define the Python function
- transform this function into a task that can be used within a pipeline using
kfp.components.create_component_from_function
The most important arguments of that function are:
func– Python functionbase_image– defines the base image for the Docker container in which the task will be executedpackages_to_install– defines dependencies. Imports must be defined inside the component.
For passing data between components, we can define input/output arguments. For small data, such as strings and numbers, you can pass them by value. For larger data, like CSV files, you need to use paths to files.
In our preprocess function we get a CSV file as input, add a header and encode categorical data, and return it, so we define our arguments as InputPath("CSV") and OutputPath("CSV") to pass it as file path.
Our train component is similar:
def train(file_path: InputPath("CSV")) -> str:
    import mlflow
    import pandas as pd
    from sklearn.neural_network import MLPClassifier
    from sklearn.model_selection import train_test_split

    df = pd.read_csv(file_path)

    labels_column = "income"
    train_x, test_x, train_y, test_y = train_test_split(
        df.drop([labels_column], axis=1),
		df[labels_column],
		random_state=69
    )

    with mlflow.start_run(run_name="income_training"):
        alpha, hidden_layers = 1e-3, (6, 4)
        mlp = MLPClassifier(
            solver="lbfgs",
            alpha=alpha,
            hidden_layer_sizes=hidden_layers,
            random_state=69,
        )

        mlflow.log_param("alpha", alpha)
        mlflow.log_param("hidden_layers", hidden_layers)

        mlp.fit(train_x, train_y)

        preds = mlp.predict(test_x)

        accuracy = (test_y == preds).sum() / preds.shape[0]
        mlflow.log_metric("accuracy", accuracy)

        result = mlflow.sklearn.log_model(
            sk_model=mlp,
            artifact_path="model",
            registered_model_name="income_model",
        )
        return f"{mlflow.get_artifact_uri()}/{result.artifact_path}"

train_op = create_component_from_func(
    func=train,
    base_image="python:3.9",
    packages_to_install=["mlflow", "pandas", "sklearn", "boto3"],
)
The most significant difference is that now we’re returning a string. As we have just learned, strings can be passed by value so there isn’t much difference between this component and normal Python function.
Pipeline
With all our components written, we can add them to the pipeline.
@dsl.pipeline(
    name="income_pipeline",
    description="Pipeline for training and deploying a model trained on Census Income dataset",
)
def income_pipeline():
    downloader_task = web_downloader_op(
        url="https://archive.ics.uci.edu/ml/machine-learning-databases/adult/adult.data"
    )
    preprocess_task = preprocess_op(file=downloader_task.outputs["data"])
    train_task = (
        train_op(file=preprocess_task.outputs["output"])
        .add_env_variable(
            V1EnvVar(
                name="MLFLOW_TRACKING_URI",
                value="http://mlflow-server.kubeflow.svc.cluster.local:5000",
            )
        )
        .add_env_variable(
            V1EnvVar(
                name="MLFLOW_S3_ENDPOINT_URL",
                value="http://minio.kubeflow.svc.cluster.local:9000",
            )
        )
    ).apply(
        use_k8s_secret(
            secret_name="mlpipeline-minio-artifact",
            k8s_secret_key_to_env={
                "accesskey": "AWS_ACCESS_KEY_ID",
                "secretkey": "AWS_SECRET_ACCESS_KEY",
            },
        )
    )
Again, defining a pipeline is simple, add a decorator and all tasks in the Python function.
You might be wondering why we didn’t pass output_file to preprocess_op That’s because output parameters should not be given explicitly by the author, they will be given at component runtime by the backend.
There are two ways to make tasks follow each other. Implicit dependency is created when one task uses the output from another task as its input. An explicit dependency can be created by calling .after(task_before) on the second task.
We also need to define environment variables like MLFLOW_TRACKING_URI and MLFLOW_S3_ENDPOINT_URL and secrets like AWS_ACCESS_KEY_ID and AWS_SECRET_ACCESS_KEY. Defining env variables is easy, more info on them here. For secrets, check out Kubernetes docs and Kubeflow docs for your desired platform.
Environment variables are saved in plain text in pipeline.yaml so for sensitive information use k8s secrets!
Endgame
Once we have written our code, we need to compile the pipeline to YAML. You can either compile it and upload it to the Kubeflow UI, or you can run it using the Kubeflow Pipelines SDK client. The first option is easier, so we’re going to do that one.
Run the following code to compile and save your pipeline in YAML format.
kfp.compiler.Compiler().compile(pipeline_func=income_pipeline, package_path="income.yaml")
Upload income.yaml and run it in the UI.
In this case, we deployed Kubeflow with MinIO instance, so we don’t have to define pipeline root, in case you’re using external AWS S3 or GCS check out documentation.
After the run is completed, you can check out your trained model in MLflow UI.

Congratulations, you just trained a model using Kubeflow and MLflow. The next step would be serving that model using MLflow or some other serving service.