Would you like to install the Red Hat API Management system on your local machine?
It is not hard to install it locally – you need an OpenShift Local setup with enough memory and the operator will take care of the rest.
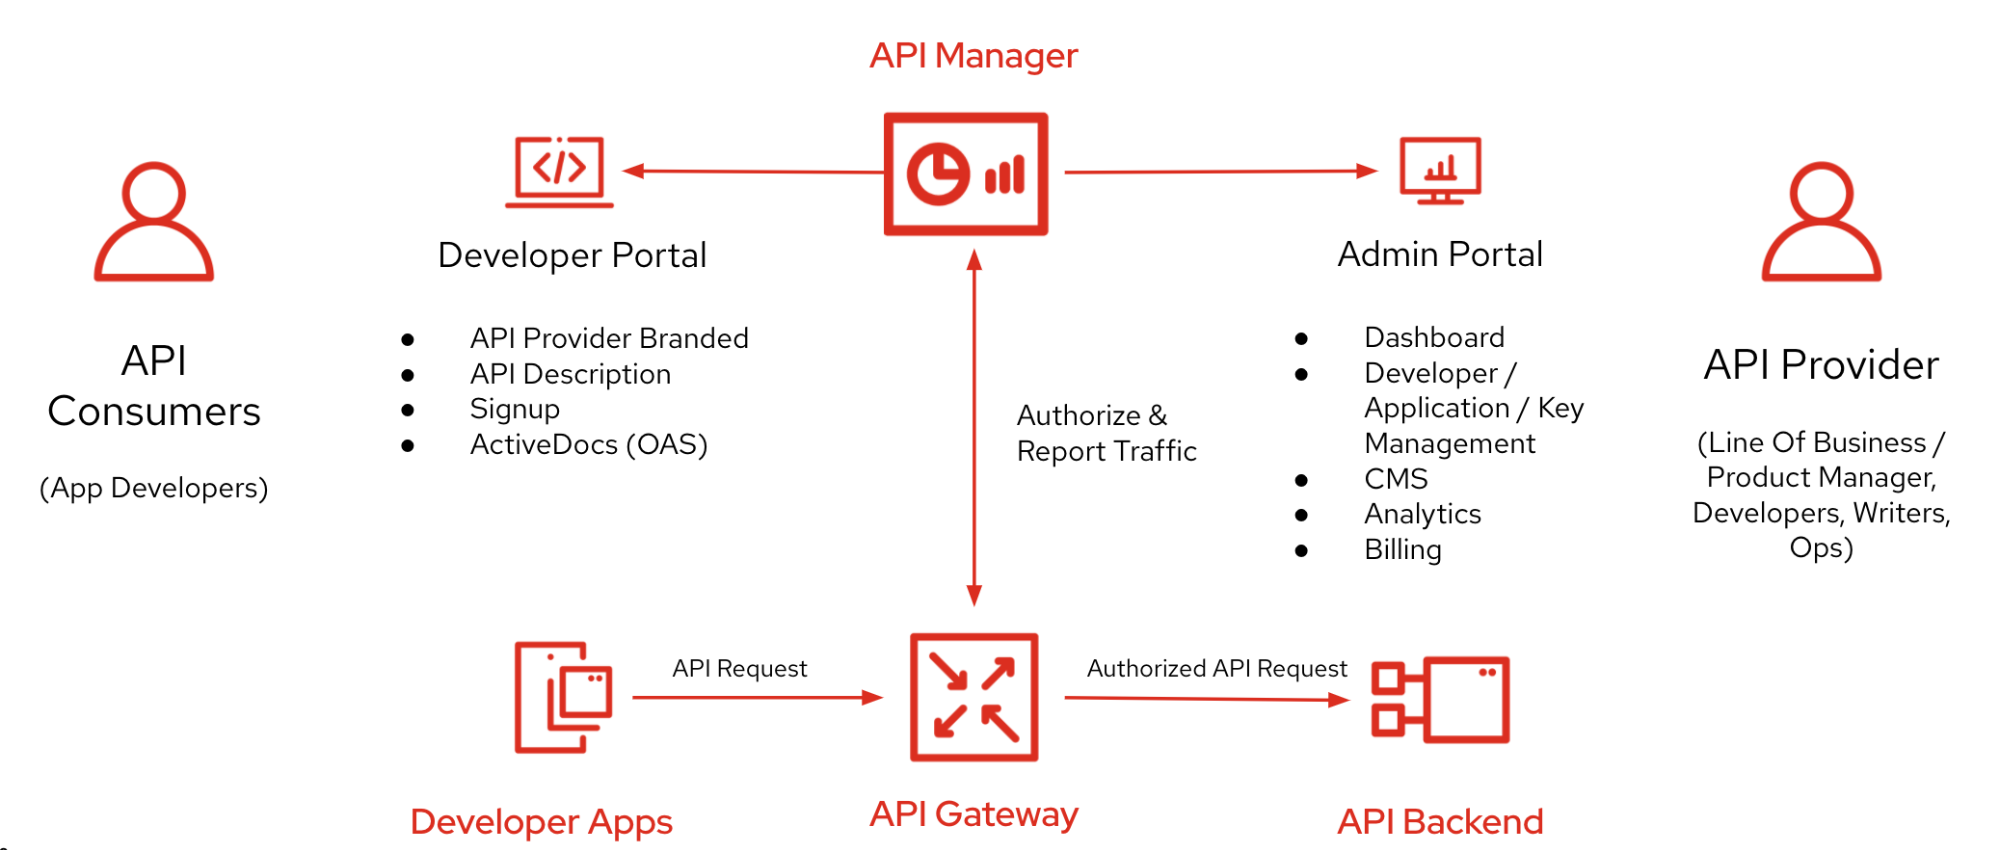
Red Hat 3scale API Management
3scale is a Red Hat API Management solution that enables you to share, secure, distribute, control, and monetize your APIs. It can be installed on-premise, used from the cloud or you can even deploy it in a so-called “hybrid” mode where API gateways are installed on-premise while the API management is set up in the cloud.
OpenShift Local
Red Hat OpenShift Local enables you to run an OpenShift on your local computer to simplify the setup, deployment, and testing of your cloud-native applications on your local machine.
Install the OpenShift Local
Log in to your Red Hat account and download the OpenShift Local for the appropriate platform from the Red Hat Hybrid Cloud Console.
Install the OpenShift local following instructions from the Red Hat documentation.
On my Ubuntu 22.04 machine, the only notable difference from the instructions was that I needed to select the qemu-system-x86 package instead of the qemu-kvm package.
Create & start the OpenShift Local
There are just a few commands you need to run to create and start the OpenShift Local. The first command will pull ~3 GiB *.crcbundle to your local home .crc directory.
crc setup
After that, you can configure local OpenShift to use a bit more memory, cores, and disk than the default. With the default 9 GiB of memory, 3scale was not able to start successfully. After configuration is performed, run the crc start command and give the OpenShift Local some time to start.
# Default is 9 GiB memory (9216), 4 cores, 31 GiB disk.
crc config set memory 16384
crc config set cpus 8
crc config set disk-size 48

crc start
You can always check the status of your cluster with the crc status command.
After starting the OpenShift Local on my Ubuntu machine I realized that the DNS resolving doesn’t work as it should (as described in the crc issue on the GitHub). The workaround is to wait for the creation of the new network interface named crc and apply the following changes using the resolvectl commands:
# check if crc device is created
ip addr show dev crc

sudo resolvectl domain crc ~testing
sudo resolvectl dns crc 192.168.130.11
sudo resolvectl llmnr crc yes

# test if DNS is working properly
host console-openshift-console.apps-crc.testing
After the OpenShift Local is fully started, open the OpenShift console in your browser by running the crc console command. Get the sign-in credentials for the console using the crc console --credentials command.
Install the 3scale API Management system
- create the
3scalenamespace (or use any other name you prefer) - install a 3scale operator
- login as a
kubeadmin - Operators / OperatorHub: Red Hat Integration – 3scale
- (You can use the community version instead (3scale API Management)
- login as a
- install a 3scale
- log in as a
developer - Operators / Installed Operators: Red Hat Integration – 3scale
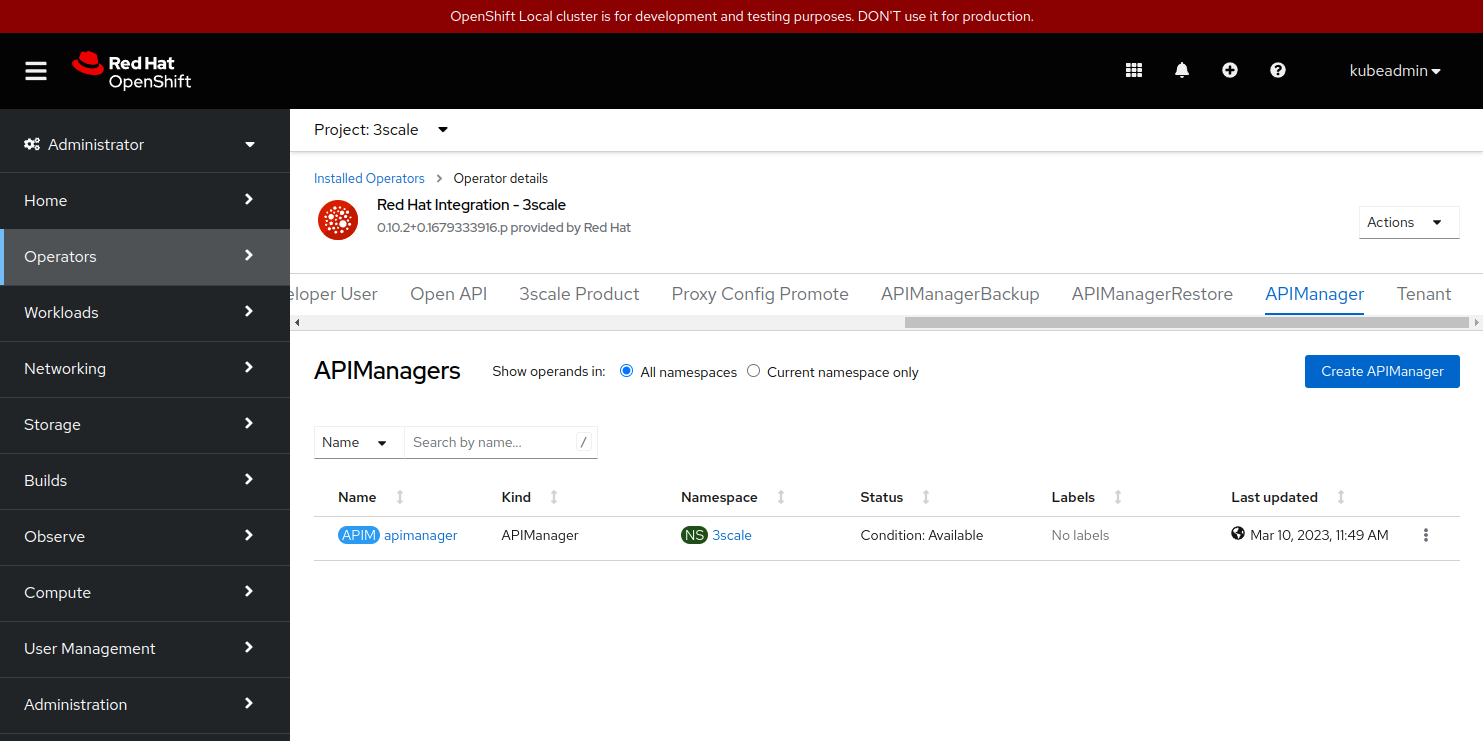
- Navigate to tab APIManager and click on the Create APIManager action
- (make sure to adjust the
APIManagercustom resource with properwildcardDomainandresourceRequirementsEnabledvalues)
- log in as a
The APIManager custom resource must be adjusted according to the template given below. Just edit the YAML definition to include proper wildcardDomain and resourceRequirementsEnabled values.
apiVersion: apps.3scale.net/v1alpha1
kind: APIManager
metadata:
   name: apimanager
   namespace: 3scale
spec:
  wildcardDomain: apps-crc.testing
  resourceRequirementsEnabled: false
The wildcardDomain value must be set to your OpenShift DNS domain (apps-crc.testing).
The resourceRequirementsEnabled value must be set to false to enable 3scale to start with fewer resources than it should need in the production environment.
After creating the APIManager you just need to wait a few minutes and your 3scale will be up & running. Now you can install your APIs, configure your Applications or just explore the Red Hat 3scale API Management solution
Cover image by Francois Van Staden