Have you tried deploying a docker version of IBM DataPower to Amazon Elastic Container Service and didn’t know how to get started? What is the first step? What do you need to do to bring DataPower to life within AWS? Well, this post could be an excellent starting point. I got stuck at the same spot, so I came up with the basic steps needed to deploy DataPower into AWS.
DataPower deployment process in AWS begins by creating an ECS cluster in the AWS management console. An ECS cluster is a logical group of tasks or services. In this case, the cluster infrastructure is provided by Amazon Fargate, which is a serverless infrastructure maintained by Amazon.
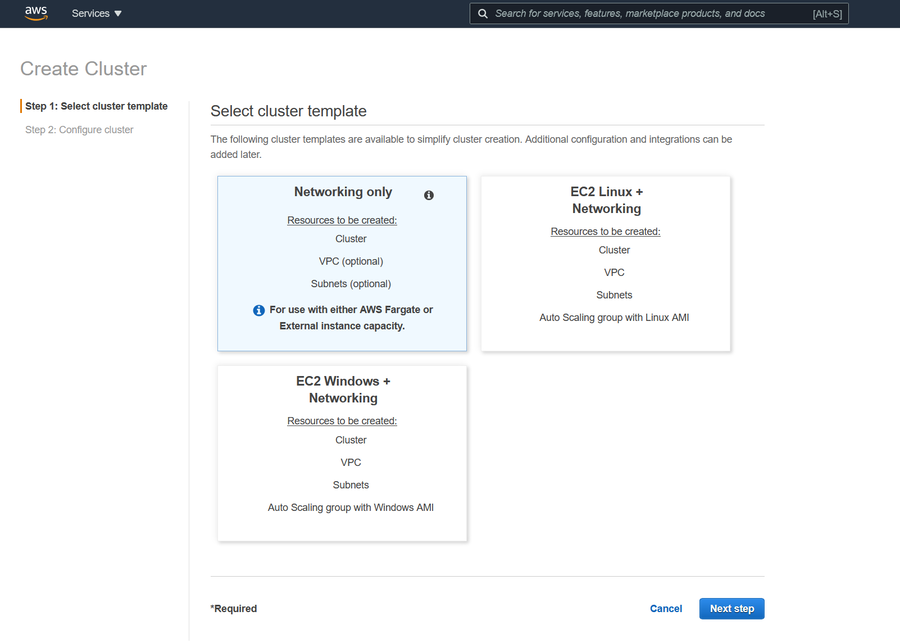
Creating a Amazon ECS cluster
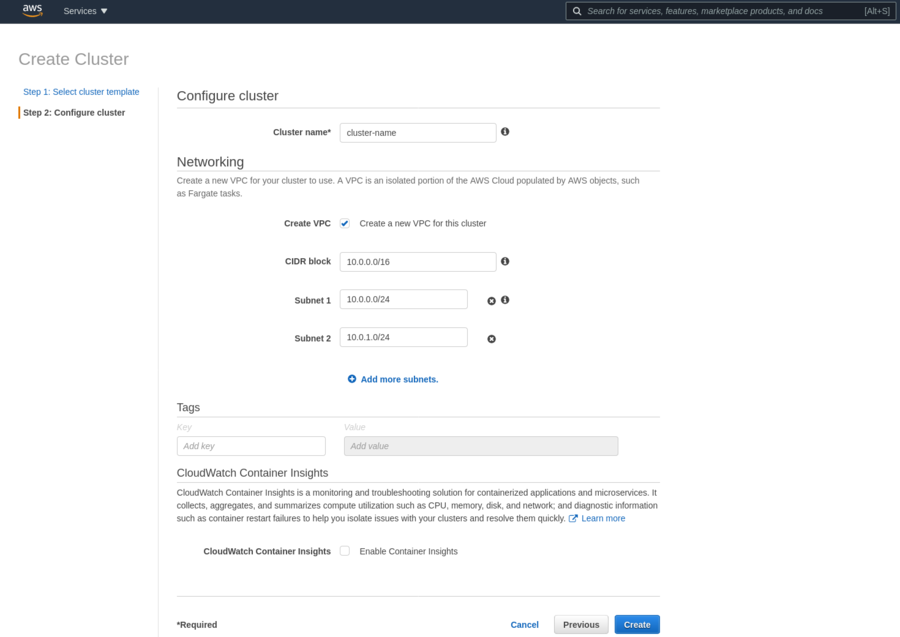
Creating a Amazon ECS cluster
Task definition
The next step is to create a Task definition. Task definition describes which containers will be created within the task, resource reservation per container and task, how the containers will be linked, and which ports they will use.
For DataPower deployment purposes, we need to create two containers:
- datapower-config – a container used to create configuration files required to successfully deploy and run Datapower (DataPower in Docker comes completely locked, so we need to add configuration files to be able to access the WebGUI management interface or change the initial password for “admin” user).
- datapower_10_0_1_3 – DataPower container with the version of DataPower to be deployed. In this case, the version is 10.0.1.3.
But first, we have to fill in some basic information about the task (task name, resource limits, etc.). Memory and CPU allocations are:
- Task memory – 5GB
- Task CPU – 2vCPU
Additionally, we need to create two volumes. “Volumes” represent a directory or file on the host filesystem which can be mounted in a container. Through “Volumes” we can add different configurations to a container. In this case, we have to create volumes “dp-config” and “dp-local” and select “Bind Mount” as “Volume Type”. Those “Volumes” will serve as directories that will be used by DataPower as storage.
The next step after creating “Volumes” is to create container definitions. A container definition describes container properties. For example, which docker image is used to run a container, resource limits, storage, port mappings, commands that need to execute when the container starts, etc. First, we have to create a datapower-config container definition. This container will have to run before the DataPower container starts to prepare and store the necessary configuration files on a host filesystem. Container definition can be created through an interactive web user interface or by using a JSON definition. JSON definitions have to be placed inside square brackets of a “containerDefinition” key.
JSON definition for datapower-config container:
{
   "dnsSearchDomains":null,
   "environmentFiles":null,
   "logConfiguration":{
      "logDriver":"awslogs",
      "secretOptions":null,
      "options":{
         "awslogs-group":"/ecs/datapower_deploy",
         "awslogs-region":"us-east-1",
         "awslogs-stream-prefix":"ecs"
      }
   },
   "entryPoint":null,
   "portMappings":[

   ],
   "command":[
      "bash",
      "-c",
      "echo 'top; co;nexec config:///auto-user.cfgnnweb-mgmtn admin-state "enabled"n local-address "0.0.0.0" "9090"nexitn' > /opt/ibm/datapower/drouter/config/auto-startup.cfgnnecho 'top; co;nn%if% available "user"nnuser "admin"n summary "Administrator"n password-hashed "$1$12345678$0eDm478YNM8C4R3R2Rour1"n access-level privilegednexitnn%endif%n' > /opt/ibm/datapower/drouter/config/auto-user.cfg"
   ],
   "linuxParameters":null,
   "cpu":0,
   "environment":[

   ],
   "resourceRequirements":null,
   "ulimits":null,
   "dnsServers":null,
   "mountPoints":[
      {
         "readOnly":null,
         "containerPath":"/opt/ibm/datapower/drouter/config",
         "sourceVolume":"dp-config"
      }
   ],
   "workingDirectory":null,
   "secrets":null,
   "dockerSecurityOptions":null,
   "memory":null,
   "memoryReservation":128,
   "volumesFrom":[

   ],
   "stopTimeout":null,
   "image":"public.ecr.aws/amazonlinux/amazonlinux:latest",
   "startTimeout":null,
   "firelensConfiguration":null,
   "dependsOn":null,
   "disableNetworking":null,
   "interactive":null,
   "healthCheck":null,
   "essential":false,
   "links":null,
   "hostname":null,
   "extraHosts":null,
   "pseudoTerminal":null,
   "user":null,
   "readonlyRootFilesystem":null,
   "dockerLabels":null,
   "systemControls":null,
   "privileged":null,
   "name":"datapower-config"
}
datapower-config container definition uses amazonlinux:latest image to create a basic Linux container which will prepare and store configuration files in „dp-config” volume on path: „/opt/ibm/datapower/drouter/config”. To create a config file, which enables WebGUI management interface on port 9090 and sets the default password for user “admin” to “admin2020”, we use the following commands (“command” key in JSON definition):
bash,-c,echo 'top; co;
exec config:///auto-user.cfg
web-mgmt
admin-state "enabled"
local-address "0.0.0.0" "9090"
exit
' > /opt/ibm/datapower/drouter/config/auto-startup.cfg
echo 'top; co;
%if% available "user"
user "admin"
summary "Administrator"
password-hashed "$1$12345678$0eDm478YNM8C4R3R2Rour1"
access-level privileged
exit
%endif%
' > /opt/ibm/datapower/drouter/config/auto-user.cfg
Next, we create datapower_10_0_1_3 container definition. For this container, we use ibmcom/datapower:10.0.1.3 image supplied by IBM in the public docker hub repository (obsolete). JSON definition for datapower-10_0_1_3 container:
{
   "dnsSearchDomains":null,
   "environmentFiles":null,
   "logConfiguration":{
      "logDriver":"awslogs",
      "secretOptions":null,
      "options":{
         "awslogs-group":"/ecs/datapower_deploy",
         "awslogs-region":"us-east-1",
         "awslogs-stream-prefix":"ecs"
      }
   },
   "entryPoint":null,
   "portMappings":[
      {
         "hostPort":9090,
         "protocol":"tcp",
         "containerPort":9090
      },
      {
         "hostPort":443,
         "protocol":"tcp",
         "containerPort":443
      },
      {
         "hostPort":5550,
         "protocol":"tcp",
         "containerPort":5550
      },
      {
         "hostPort":5554,
         "protocol":"tcp",
         "containerPort":5554
      },
      {
         "hostPort":22,
         "protocol":"tcp",
         "containerPort":22
      }
   ],
   "command":[

   ],
   "linuxParameters":null,
   "cpu":2048,
   "environment":[
      {
         "name":"DATAPOWER_ACCEPT_LICENSE",
         "value":"true"
      },
      {
         "name":"DATAPOWER_WORKER_THREADS",
         "value":"2"
      }
   ],
   "resourceRequirements":null,
   "ulimits":null,
   "dnsServers":null,
   "mountPoints":[
      {
         "readOnly":null,
         "containerPath":"/opt/ibm/datapower/drouter/config",
         "sourceVolume":"dp-config"
      },
      {
         "readOnly":null,
         "containerPath":"/opt/ibm/datapower/drouter/local",
         "sourceVolume":"dp-local"
      }
   ],
   "workingDirectory":null,
   "secrets":null,
   "dockerSecurityOptions":null,
   "memory":null,
   "memoryReservation":4096,
   "volumesFrom":[

   ],
   "stopTimeout":null,
   "image":"ibmcom/datapower:10.0.1.3",
   "startTimeout":null,
   "firelensConfiguration":null,
   "dependsOn":[
      {
         "containerName":"datapower-config",
         "condition":"COMPLETE"
      }
   ],
   "disableNetworking":null,
   "interactive":null,
   "healthCheck":null,
   "essential":true,
   "links":null,
   "hostname":null,
   "extraHosts":null,
   "pseudoTerminal":null,
   "user":null,
   "readonlyRootFilesystem":null,
   "dockerLabels":null,
   "systemControls":null,
   "privileged":null,
   "name":"datapower_10_0_1_3"
}
DataPower deployment
To deploy DataPower, we have to create a Service in the ECS cluster. For Launch Type, we pick Fargate; for Task definition, we use the task definition we have just created (in my case, task definition name is datapower_deploy), and for Number of tasks enter 1.
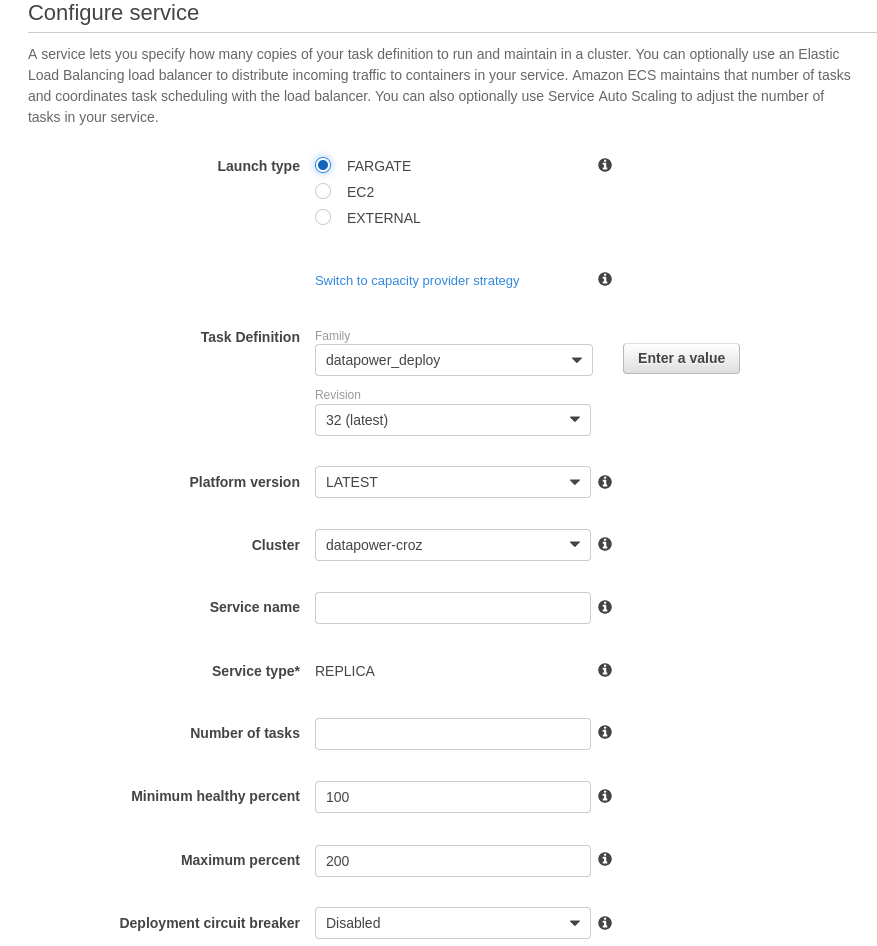
Creating a “Service”
In the Configure Network screen, we have to enable access to the DataPower WebGUI management interface available on port 9090. We do that by editing the Security groups and adding an inbound rule. You can also add additional rules for ports that are defined in the JSON definition for the datapower_10_0_1_3 container:
- TCP 443 – HTTPS API port
- TCP 5550 – XML management interface port
- TCP 5554 – REST management interface port
- TCP 22 – SSH port

Enabling access to DataPower WebGUI management interface
All other values in the remaining screens do not need to be changed. The Service should be successfully created now. To check the current status of the service and task, we open the Services or Tasks tab. The desired state of a service needs to be marked as ACTIVE, and the desired task state should be marked as RUNNING. That means DataPower is online. Then, we can access the WebGUI management interface via a public IP address. A public IP address is visible when selecting the running task id in tab Tasks. WebGUI URL will look like something like this: https://task_public_ip:9090.
Conclusion
By following these basic steps, you should be able to deploy DataPower, open its WebGUI management interface, and log in as an admin user.
Once you log in, you can start developing, testing, and deploying DataPower services which will now be available in the AWS environment.
The cover image is created by Cookiecutter.com from Pexels.