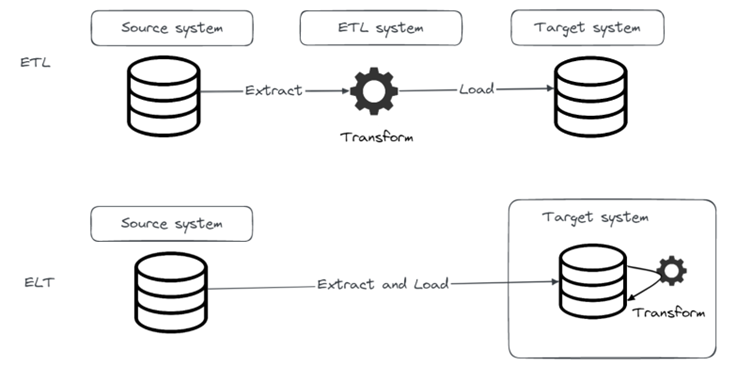
In one of our previous blog posts we introduced a popular open-source EL(T) tool called Airbyte that provides EL functionality and integrates with dbt for the T part. In this blog post we will introduce dbt, demonstrate how to get started with dbt, run your first dbt project and how to integrate it with Airbyte.
dbt intro
Dbt is a transformation workflow tool that helps data engineering teams be more productive with easier collaboration on data models, versioning, testing and documenting.
Dbt is available as an open-source project, commonly known as dbt Core, that can be simply installed on-prem using one of the available options such as a Python package or on Docker. After installing dbt you will be provided with a CLI that will be used to run your dbt projects.
There is also a commercial offering called dbt Cloud that also offers some additional benefits like web-based UI with IDE, observability and in-app job scheduler.
What dbt enables us is to write efficient, well documented and easy to test SQL queries flavored with jinja templating. In a dbt project, we will write queries (called models in dbt), compile them and run on the target database. For the running part, dbt will just push compiled queries to database that will run the query and store result in a new table or view.
Along the way, from writing queries to running them, we can (and always should) write tests on our data and leverage dbt’s nice documenting features. In the remainder of the blog we will create dbt project from scratch, prepare some models, document them, write tests and finally run our models.
Data platforms
Dbt doesn’t have its own query engine, instead it connects to and runs SQL against your database or query engine. The database or engine you are connecting to is called data platform in dbt terminology. Connecting to some specific database will require an adapter plugin (Python module). Most of the popular data platforms are supported like Postgres, Oracle, DB2, Snowflake, Redshift, Azure Synapse, Spark, Hive or Trino. Full list of available adapters can be viewed here. If your favorite data platform is missing, you can develop it and contribute to the project. It is important to note that not all dbt Core adapters are available in the dbt Cloud.
dbt project
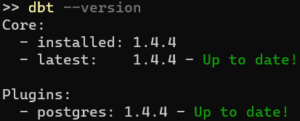
In the test dbt project we will demonstrate, dbt is installed using pip install dbt-postgres. Which will install dbt-core and dbt-postgres that provides Postgres adapter. We can check the version of dbt we installed by running dbt CLI command dbt –version in terminal.
When starting up with dbt, first thing you will run in dbt CLI is dbt init.
CLI will prompt you for the project name
![]()
After that dbt will provide the list of available installed adapters, in our case it will be Postgres adapter so we will choose that.

After that our project will be successfully set up.
Now we can look at our file system and check what dbt created for us. After dbt init was successfully run we see that there are two folders created: logs and my_first_dbt_project. Logs folder contains dbt.logs file where we can see logs related to our dbt init run. And my_first_dbt_project folder is our dbt project folder in which all dbt files like configurations and models will be stored. Let’s check the dbt project structure.

We’ll start with dbt_project.yml file. This is the main configuration file that contains the most important information about our project. The full list of configurations that you can change is available in the dbt documentation [https://docs.getdbt.com/docs/build/projects] but here we will focus on three things:
Name
- Name of the project
- In our example my_first_dbt_project
Profile
- Name of the profile used to connect to your data store
- In our example postgres_dwh
Models
- This is where our sql models will be stored in form of .sql files
# Name your project! Project names should contain only lowercase characters
# and underscores. A good package name should reflect your organization's
# name or the intended use of these models
name: 'my_first_dbt_project'
version: '1.0.0'
config-version: 2

# This setting configures which "profile" dbt uses for this project.
profile: 'my_first_dbt_project'

# These configurations specify where dbt should look for different types of files.
# The `model-paths` config, for example, states that models in this project can be
# found in the "models/" directory. You probably won't need to change these!
model-paths: ["models"]
analysis-paths: ["analyses"]
test-paths: ["tests"]
seed-paths: ["seeds"]
macro-paths: ["macros"]
snapshot-paths: ["snapshots"]

target-path: "target"  # directory which will store compiled SQL files
clean-targets:         # directories to be removed by `dbt clean`
  - "target"
  - "dbt_packages"
  - "logs"

# Configuring models
# Full documentation: https://docs.getdbt.com/docs/configuring-models

# In this example config, we tell dbt to build all models in the staging/ directory
# as views and all models in the consumption/ directory as tables.
# These settings can be overridden in the individual model files
# using the `{{ config(...) }}` macro.
models:
  my_first_dbt_project:
    # Config indicated by + and applies to all files under models/example/
    staging:
      +materialized: view
    consumption:
      +materialized: table
To run dbt models we will need to have a connection to the data store where we want to run our models. That connection is specified in profiles.yml file. The location of profiles.yml can be defined in a couple of ways [https://docs.getdbt.com/docs/get-started/connection-profiles]. We will run all our commands from dbt project root directory so dbt will be able to find the profiles.yml file there.
Let’s create a profiles.yml file and set up a connection to Postgres database.
my_first_dbt_project: # name of the profile
  target: dev # default target environment
  outputs: # outputs specified for each environment
    dev: # we will specify only dev target
      type: postgres # database type
      schema: public
      threads: 4
      host: localhost
      user: <user>
      password: <password>
      port: 5432
      dbname: <database_name>
Make sure that the profile with the name specified in dbt_project.yml exists in profiles.yml file.
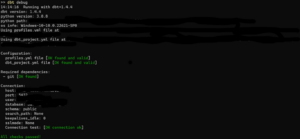
After profile is defined in profiles.yml, we can check if dbt can successfully connect to the database by running dbt debug.
dbt Models
Now we can start building our models. We’ll do that by creating models in the models folder in our dbt root directory. There are two ways to define models, using SQL and using Python. Python SDK is a new feature in dbt and is used when you can’t express everything you want with just SQL. But in this blog post we will focus only on using SQL. If you’d like us to write about Python as well, let us know.
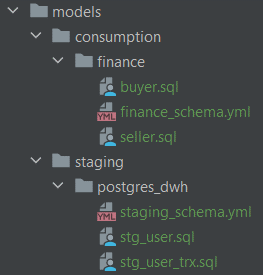
An SQL model in dbt is a select statement defined in .sql file. When you execute dbt run command, dbt will build your model by wrapping the specified select statement into create view as or create table as statement. You can, and usually will have more than one model, meaning there will be multiple .sql files in your models folder. Depending on the way you use dbt you can think about defining some logical structure inside a models folder. For this example, we will organize our models in two folders:
Staging
- Basic data structuring and cleaning is performed on raw data
- Naming standards are enforced
Consumption
- Using building blocks from staging layer to create new entities that will be ready for consumption either by additional dbt layers or other consumers of the warehouse
Each of these folders is usually further divided into subfolders based on business domain depending on the use cases for which it is used.
In this example we will use the same user and user_trx data we used in previous blog post “Python generic SCD framework”.
Data model is simple and looks as shown on the following diagram:
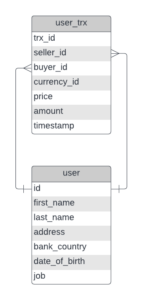
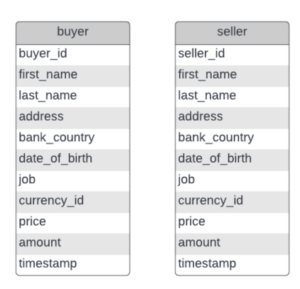
From these two tables we will create two new tables buyer and seller like we did in the previous blog post, only this time we’ll do that using dbt.
Running dbt from command line
Let’s create models and run them! We will create two staging models (stg_user and stg_user_trx) and two consumption models for finance department (buyer and seller). Staging models will be built as views while consumption models will be built as tables. That is configured in dbt_project.yml as we saw before.
# In this example config, we tell dbt to build all models in the staging/ directory as views
# and all models in the consumption/ directory as tables.
# These settings can be overridden in the individual model files
# using the `{{ config(...) }}` macro.
models:
  my_first_dbt_project:
    # Config indicated by + and applies to all files under models/example/
    staging:
      +materialized: view
    consumption:
      +materialized: table
Besides defining models we will define schemas for those models as well. We’ll have separate files for staging and finance models.
Let’s look at schemas for staging models defined in staging_schema.yml.
version: 2

models:
  - name: stg_user
    description: This table has basic information about a user

    columns:
      - name: user_id
        description: This is a unique identifier for a user
        tests:
          - unique
          - not_null

      - name: first_name
        description: User's first name. PII.

      - name: last_name
        description: User's last name. PII.

      - name: job
        description: User's job title

      - name: address
        description: User's address

      - name: bank_country
        description: User's country code

      - name: date_of_birth
        description: User's date of birth in DD.MM.YYYY format

  - name: stg_user_trx
    description: This table has basic information about a user transactions
    columns:
      - name: trx_id
        description: This is a unique identifier for a transaction
        tests:
          - unique
          - not_null

  ...
In schemas we basically define columns used in a model with description that will later be visible in documentation that can be generated. Additionally, dbt provides a bunch of out of the box tests that we can run on specific columns. Let’s take a look at one example from finance models schema defined in finance_schema.yml.
columns:
  - name: buyer_id
    description: This is a unique identifier for a user
    tests:
      - not_null
      - relationships:
          to: ref('stg_user')
          field: user_id
Here we defined two tests:
not_null
- Specifies that this column must not have null values
relationships
- Specifies with which column to check referential integrity
This is very handy because it enables us to write tests in a fast and convenient way. If these out-of-the-box tests are not good enough, on dbt-hub there is a dbt package that implements great_expectations tests into dbt, so after installing the package we can use those additional tests as well.
Besides writing tests on single columns, we could write more complex tests in form of sql queries and put them in tests folder in our dbt project.
We could write an entire series of blogs on data quality and data testing (which we will later in this year), but for now we won’t go into any more details.
Now that we have schemas and tests defined for our models, let’s finally take a look at those models.
with "user" as (
    select
        user_id,
        job as job_title,
        address,
        last_name,
        first_name,
        bank_country,
        TO_DATE(
            date_of_birth,
            CASE
                WHEN date_of_birth LIKE '____-__-__' THEN 'YYYY-MM-DD'
                WHEN date_of_birth LIKE '________' THEN 'YYYYMMDD'
                WHEN date_of_birth LIKE '__/__/____' THEN 'DD/MM/YYYY'
            END
        ) date_of_birth
    from public.user
),

stg_user as (
    SELECT *
    FROM "user"
)

select * from stg_user
In stg_user.sql we defined a model that does some basic transformations on user table in our Postgres database and stores result as a stg_user view in the database. The motivation on why we would want to do something like this is since we know that different teams are interested in user data, we want to do some basic preprocessing for them, like fix date column, so that they all get the same quality of data.
Great, now we are finally ready to run this model. There are a bunch of dbt commands available which we use to run tests, compile code, build models, generate documentation. Full list of commands is available here https://docs.getdbt.com/reference/dbt-commands.
Here we will use build command on stg_user model, which will run model and tests.
# --select enables us to select only subset of models we want to build

dbt build –select stg_user
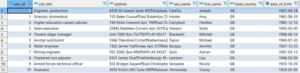
Great, our build was completed successfully! We see from the output that it created 1 view, ran 6 tests and that all tests passed. Let’s see what we have in our database. First let’s take a look at user table on top of which we created a stg_user view.

And this is what data we get from stg_user view.
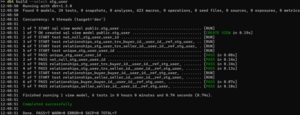
Let’s run build for the entire project and see how that goes.

We have 2 failed tests related to price column in buyer and seller models. Columns should have all values larger than zero but it seems like that’s not the case. When tests fail, dbt will still create those tables in database, so let’s take a look at data and see why tests failed.

We see that there is one row in buyer table that has price equal to zero and because of it test didn’t pass.
Generating and serving documentation
Dbt has nice feature for generating and serving documentation in form of a web page. It will use all models, schemas and metadata we created to generate documentation and even create lineage between models.
By running dbt docs generate, dbt will generate documentation in form of json file, after that we can run dbt docs serve to bring up the web server that will serve that documentation.

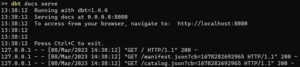
And this is what a landing page of documentation looks like:
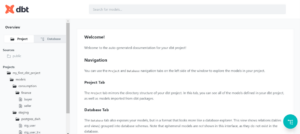
On the left hand side we can see all the models we’ve built. Let’s open buyer model by clicking on it.

Here we can see description of the model, columns, where the model is referenced, what tests are defined on it, what models and macros it depends on, and code.
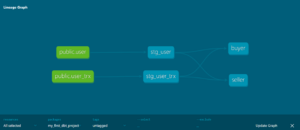
One of the nicest features is data lineage feature which we can access on the bottom right corner. Which will show the lineage of our model. In our case we will see how buyer model is built from stg_user and stg_user_trx models.
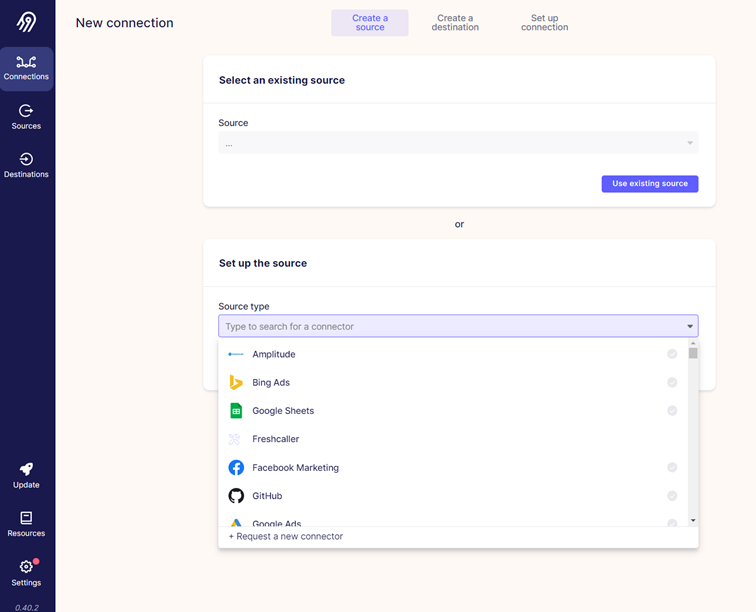
Integration with Airbyte
In the second blog post of this series, we introduced Airbyte and demonstrated how it can be used to move data between datastores. When a connection in Airbyte is defined, we can also add dbt transformations to be run after data is replicated between source and target systems defined in the connection. Airbyte brings up dbt in a Docker container, while dbt project must be hosted on either GitHub, Gitlab or Azure DevOps.

Is this all I need to know about dbt?
In this blog we demonstrated basically the entire process of setting up a dbt project, creating models and tests, running models and generating documentation. There is much more about dbt that we didn’t cover here like seeds, snapshots, scheduling with Airflow or how dbt can be integrated in ci/cd pipeline to automatically run tests, deploy code to production and serve documentation permanently.
If you would like to know more about these things, there is a bunch of materials on the internet you can look for. Or if you would like to talk to a human being, get in touch with us.
In the next and last blog post in this series we will talk about great_expectations, a Python library for data quality.
Data blog series (4 of 5):
Pt.1 – Modern ETL/ELT
Pt. 2 – EL(T) with Airbyte
Pt. 3 – Python generic SCD2 framework
Pt. 4 – Introduction to dbt